This is the complete Syntopia BOX tutorial — the one guide that takes you from a blank PC to your first AI live stream. If you have ever wondered how to go live with an AI avatar that greets viewers, pitches products and answers the chat on its own, this is the full walkthrough.
In the video below, a live stream has been running for three hours with nobody on camera and nobody typing replies. By the end of this guide, yours can be too. We will set up your computer, create your AI host, build your live room, and go live on TikTok Shop or any supported platform — then cover every other way to go live, the toolbox, and the OBS Real-Time Deduplicator.
Syntopia BOX is an on-premise Windows application you install and control on your own PC. It builds an AI digital human host, then pipes that host’s picture and voice straight into your live-streaming app. Nothing here is theory — every step and setting below comes straight from the full 37-minute walkthrough.
- A configured PC — a virtual camera and virtual sound card so BOX can send a picture and a voice into your live app.
- An AI host — an AI digital human (look) plus a voice model you can clone from a few seconds of audio.
- A live room — scripts (or AI-written scripts), an optional assistant voice, and Smart Live Chat that answers viewers in real time.
- A live stream — routed into TikTok LIVE Studio (or any platform’s app) through a one-time camera and voice setup.
- Everything beyond the basics — five ways to go live, the four-tool toolbox, and the OBS Real-Time Deduplicator for video live streams.
Chapter 1 — Set up your computer (one time)
BOX runs on your own PC. It creates your AI host and then sends that host’s picture (through a virtual camera) and its voice (through a virtual sound card) into your live app. The examples below use TikTok LIVE Studio, but the exact same setup works on every supported platform. You only do this once.
Install the virtual camera
Open the Syntopia BOX folder, go into the human-infer folder, and double-click Install Camera. A black window opens. When it says “Virtual Cam Installed,” close it. This creates a device called HD Camera — the picture channel your live app will later pull from.
Install VB-Audio Virtual Cable
This is the sound channel. Download it from the link, extract the zip, right-click the setup file and choose Run as Administrator, click Install Driver, follow the prompts, then restart the PC. After the restart, click the taskbar speaker icon and set the output device to CABLE Input (VB-Audio Virtual Cable).
Start Syntopia BOX
Back in the human-infer folder, double-click Start. A black console opens and text scrolls past. When the text stops scrolling, BOX is ready. Keep this window open the whole time you are live, and do not minimize it.
- HD Camera installed (from human-infer → Install Camera).
- VB-Audio Virtual Cable installed, PC restarted, system output set to CABLE Input.
- BOX console running and finished scrolling — left open, not minimized.
Chapter 2 — Your AI host (look + voice)
Your AI host has two parts: how it looks (the AI digital human) and how it sounds (the voice model). You create both here.
Step 1 — Create the digital human
Upload a short video of your presenter and BOX trains an avatar model from it. For the quickest setup, pick a V5 look. The result is an AI avatar — a synthetic host, not a real person.
Train with two presenters
You can film the training video with two people: the main host on the left, an assistant on the right. The assistant can talk, react, and step in and out of frame. When you train this way, tick the mouth closed option so the main host stays quiet while the assistant is the one speaking.
Step 2 — Clone a voice (optional)
A few seconds of clear audio is enough to clone a voice, or you can use one of the ready-made voices. The resulting voice model can speak 600+ languages, so your host is not limited to the language you recorded in.
Connect an AI model
So your host can actually answer questions, go to AI model and paste your API key from a provider such as OpenAI or DeepSeek. This is the brain that powers live chat replies later.

Chapter 3 — Build your live room
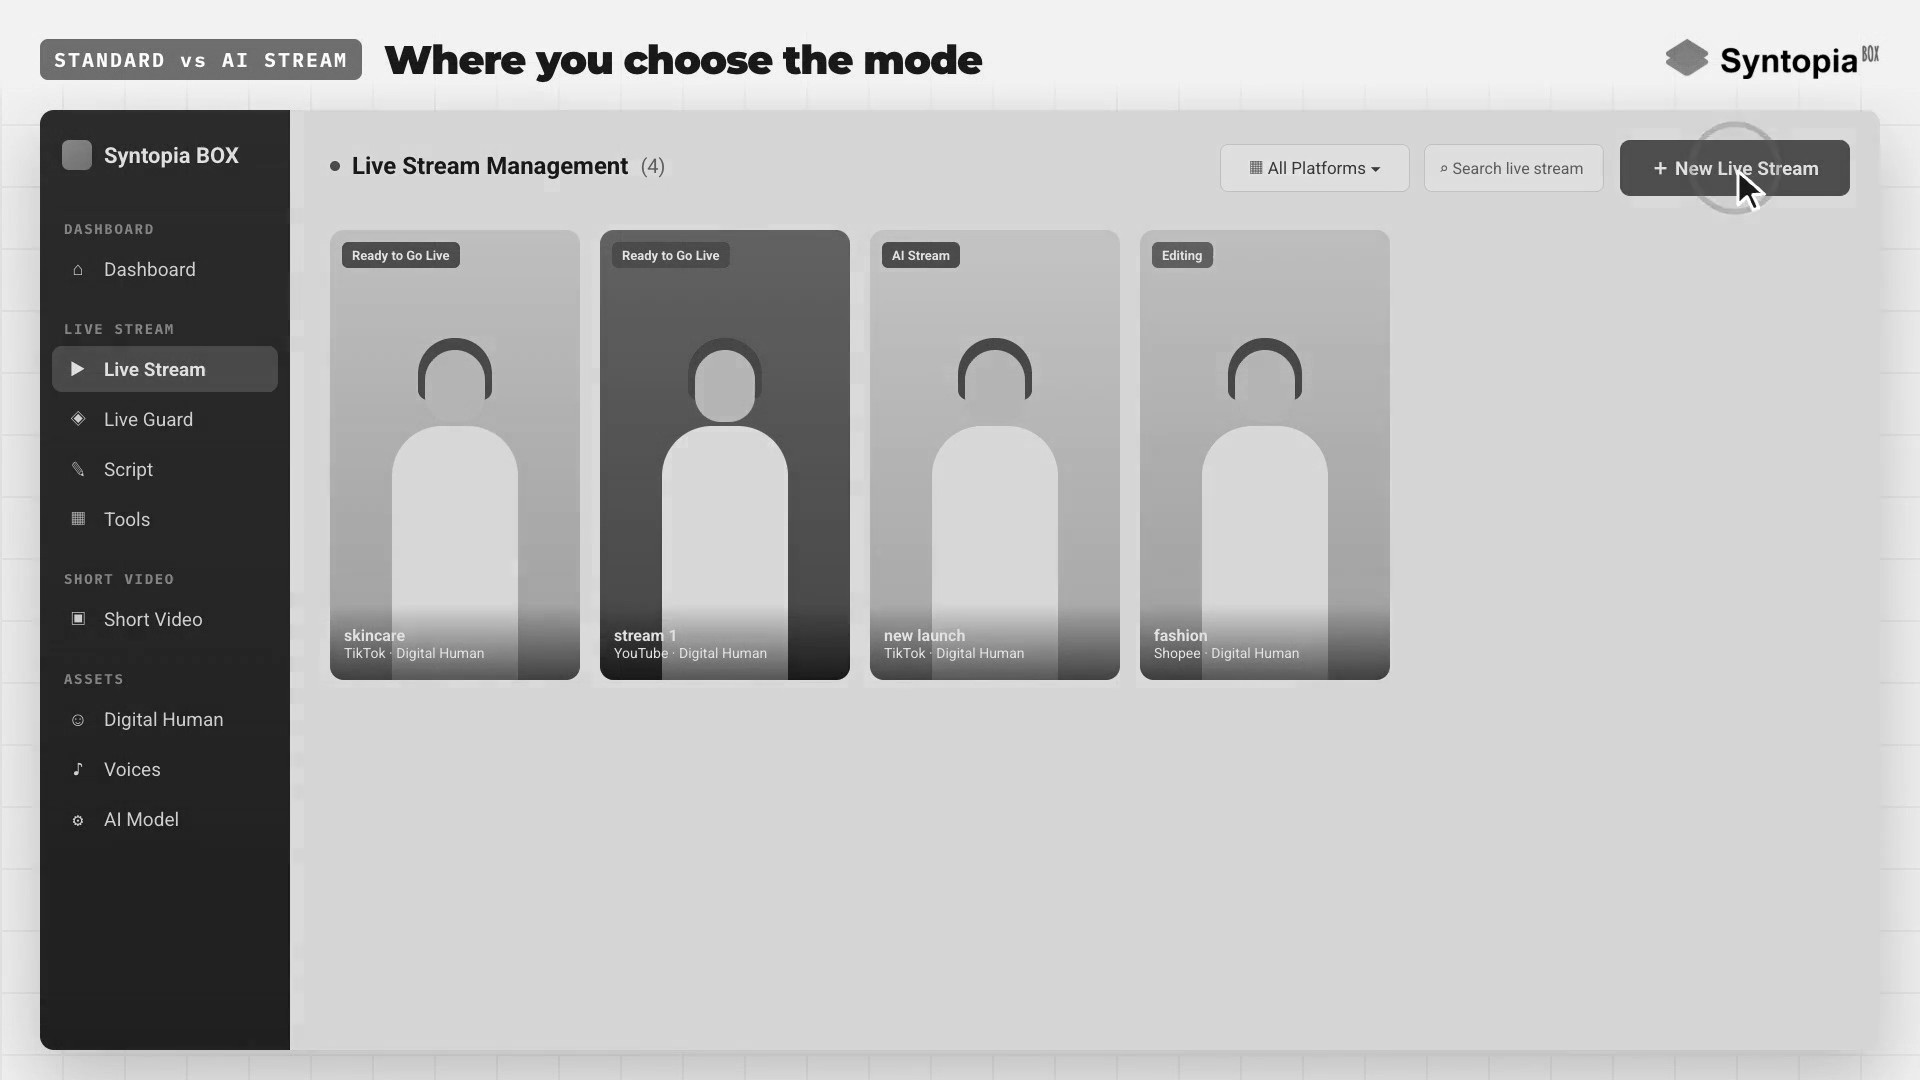
Click New Livestream, then choose your platform, product category and livestream type. Under Livestream mode you pick between two approaches.
| Mode | What it does | Best when |
|---|---|---|
| Standard Mode | You write the script. Add a product, then add scripts — type them, batch add, upload a file, or use AI Script / AI Rewrite / Continue / Vary. Full control of every word. | You need exact wording: brand messages, specific offers, must-say lines. |
| AI Stream (Beta) | No script. You import product info (name, price, selling points) and the AI writes the script automatically. Works with all five live stream types. | You want to go live fast across many products, or you have no time to write scripts. |
Segmented Variation — keep scripts fresh
Variation rewrites a script into many versions so no two runs are identical. But large models are not fully predictable: if you vary a very long script (around 5,000 characters) in one go, parts can be lost. The fix is to split the script into segments of 300–500 characters and vary each segment.
The workflow:
- Duplicate the whole script.
- Click Batch Add and paste it in. Batch Add splits at paragraph breaks, so press Enter twice wherever a new segment should begin.
- Create, for example, four segments, then click Confirm.
- Delete the original long version.
- Click Variation, type your special requirements in the box (for example: “professional but easy to follow, friendly, clear, credible, no exaggeration” and “avoid internet slang”), then Confirm.
During the live stream the system picks one sentence at random from each set of {curly brackets} and one word from each set of [square brackets], so every run comes out different.
Add a second voice — the assistant
Open the live stream and go to the script tab (it says “Supports co-host mode”). Any text you put in (round brackets) is assigned to the assistant; the host rests while the assistant speaks that line. For example:
This serum is our best seller. (And today it’s 20% off.)
Give the assistant its own voice in Settings → Assistant Voice → Enable, and pick a voice different from the host. If you trained with two people, the assistant appears on screen on the right; if you trained with one person, the assistant is voice only. To let the assistant answer live questions too, go to AI Chat → Live Chat Method and tick Assistant.
Smart Live Chat — make it interactive
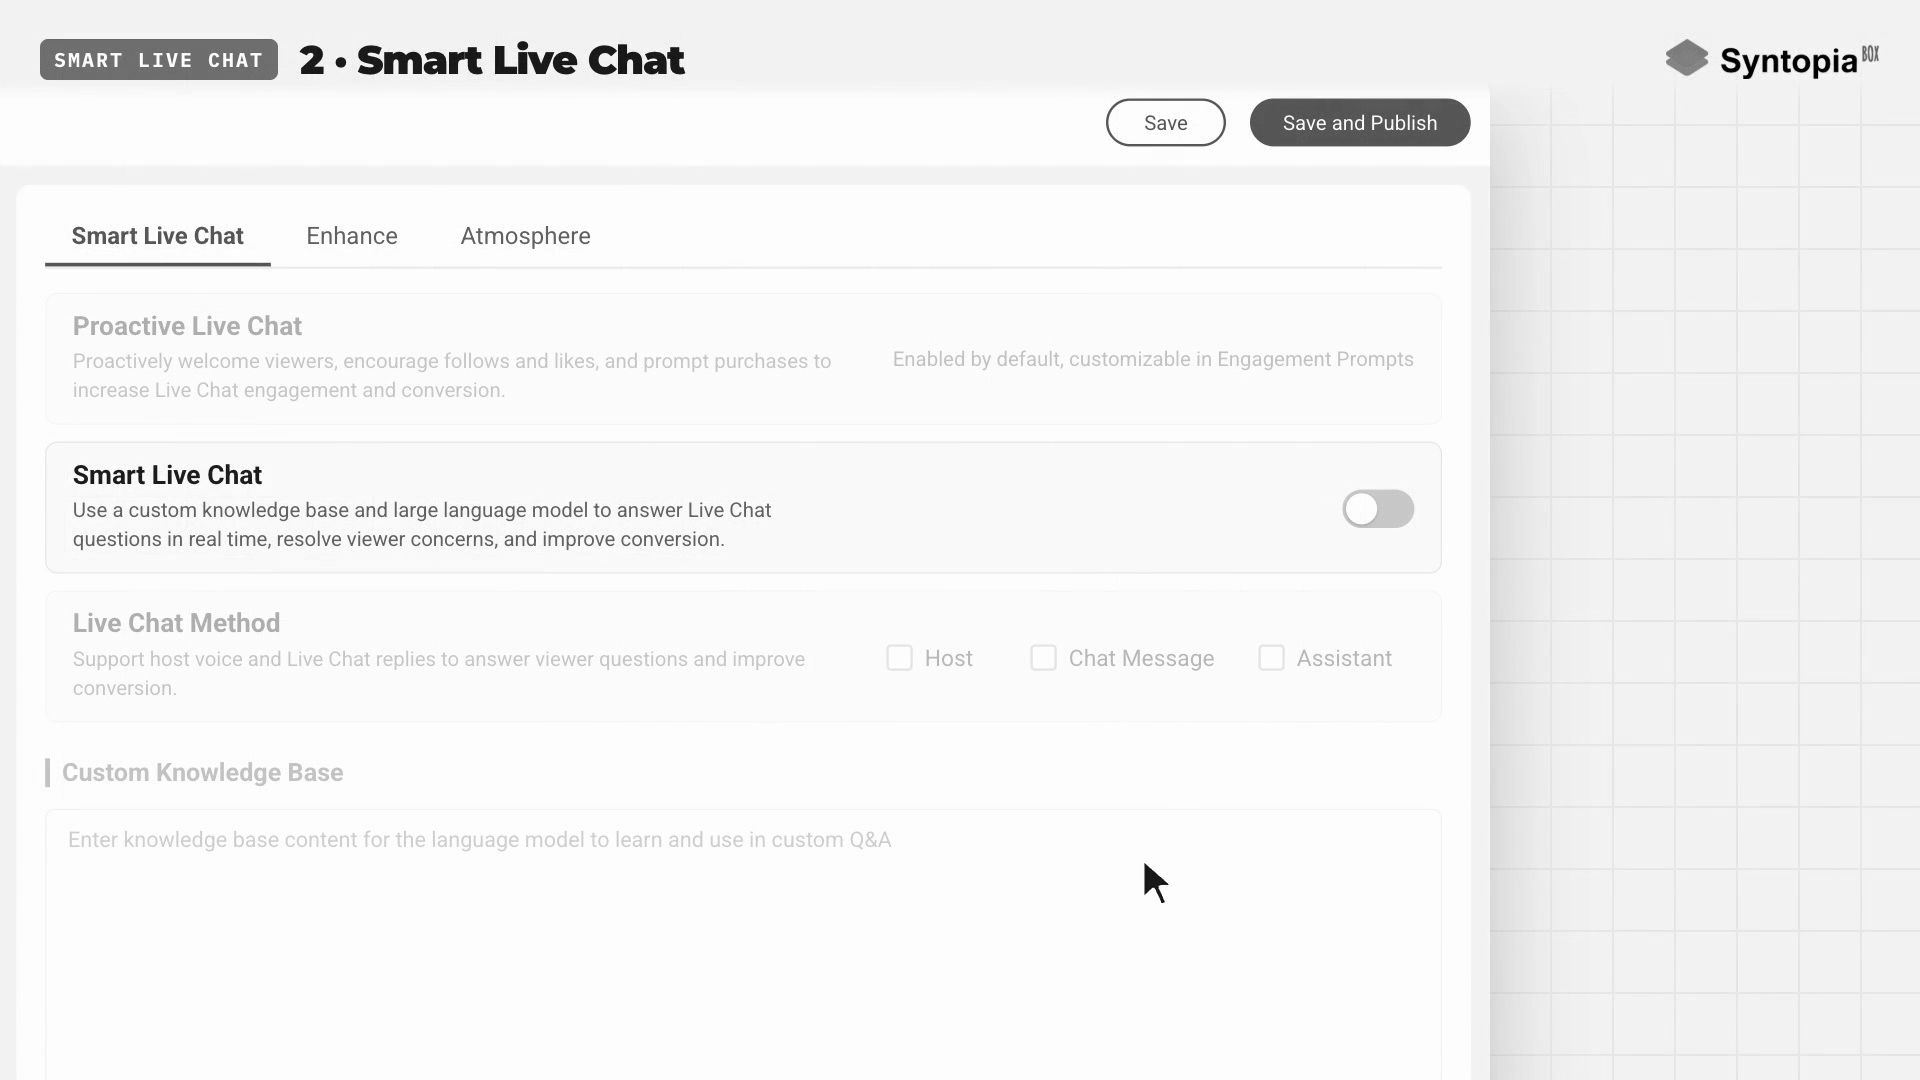
In the live stream, open the AI Chat tab. There are three settings plus a knowledge base.
- Proactive Live Chat: welcomes new viewers, asks for follows and likes, and nudges people to buy. On by default; customize the wording in Engagement Prompts.
- Smart Live Chat: turn it on and an LLM answers chat questions in real time using your knowledge base. Live Chat Method decides who answers: Host (speaks out loud), Chat message (text reply in the chat), or Assistant (the assistant voice). Tick one, two, or all three.
- Custom knowledge base: up to 20,000 characters — prices, sizes, shipping, returns, and the best answers to common questions. The better your knowledge base, the better the answers.
Chapter 4 — Go live
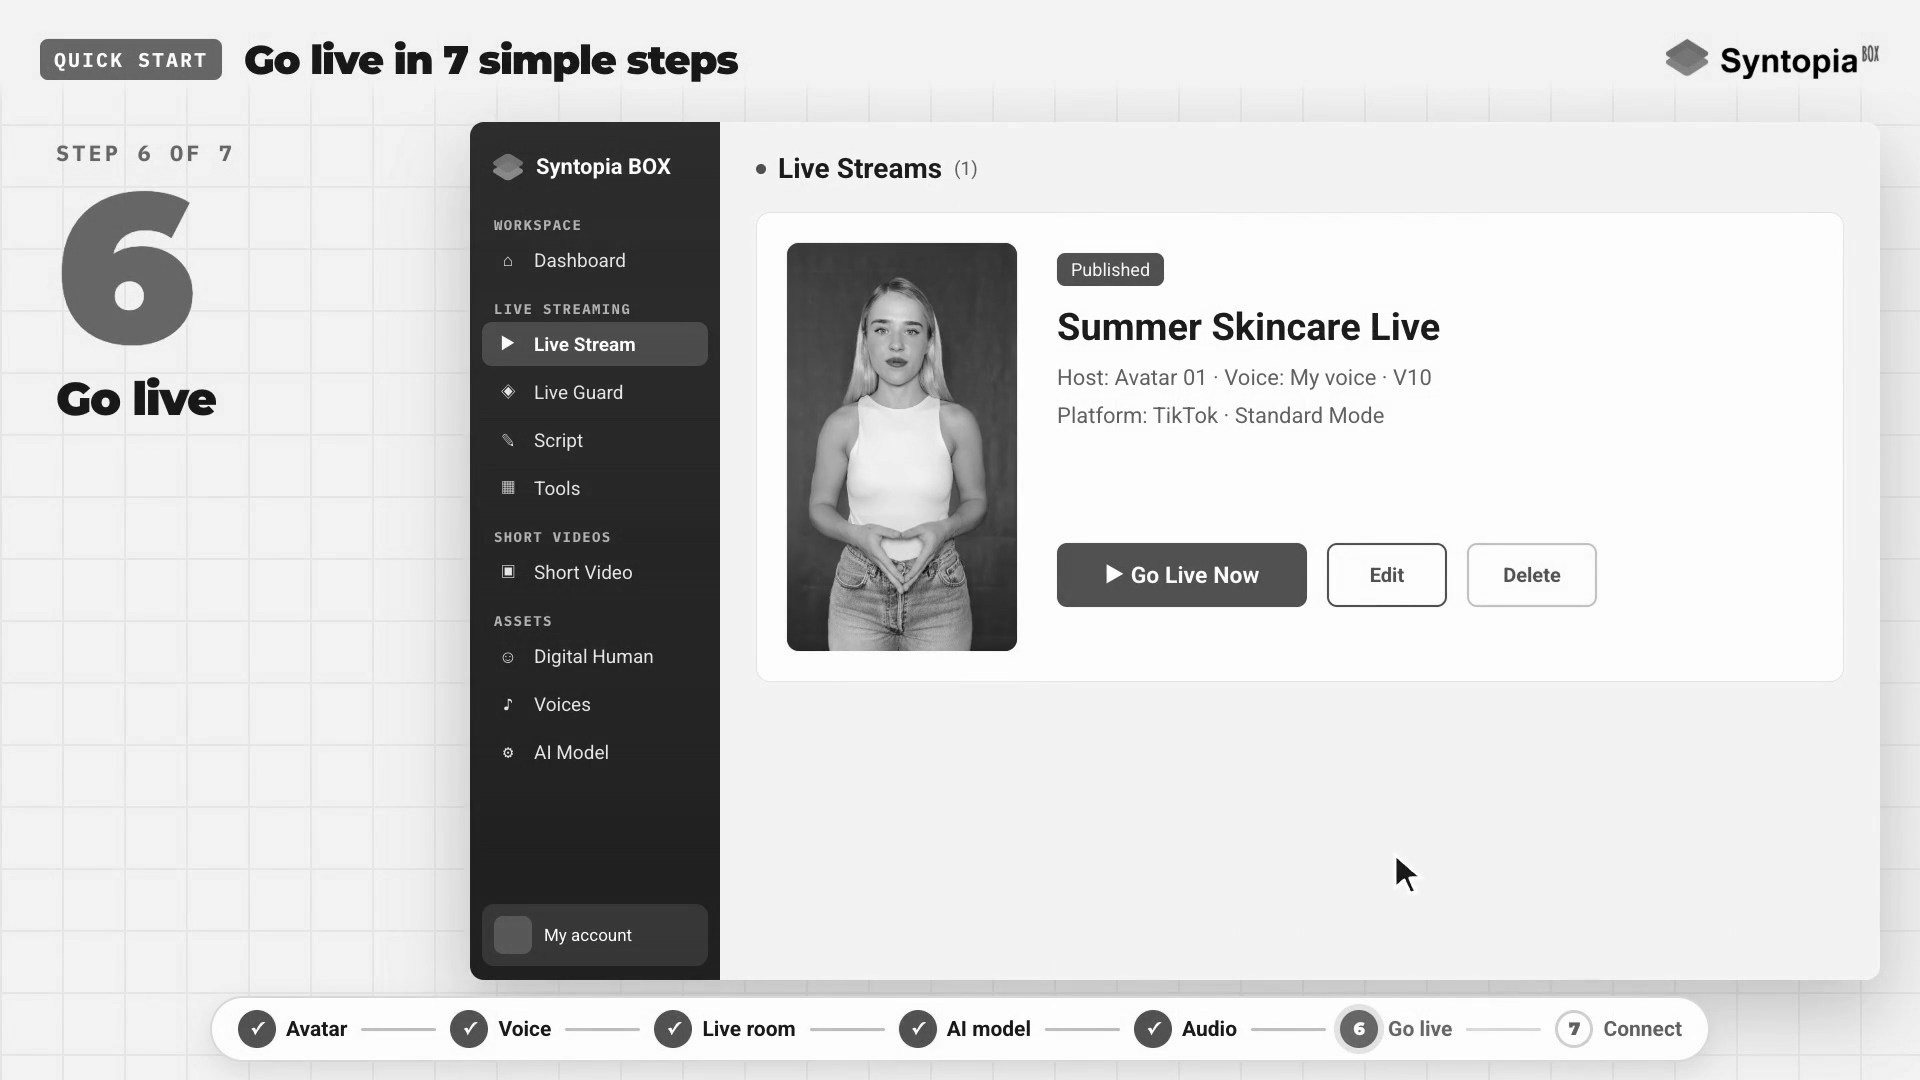
When your room is ready, click Save and Publish. The example app is TikTok LIVE Studio, but every platform’s app works the same way — it just needs a camera and a microphone. Each BOX stream sends two things into that app: a picture and a voice. You set the routing once.
Voice routing
The voice travels through VB-Audio Virtual Cable. In BOX’s live console, set Speaker = CABLE Input. In TikTok LIVE Studio, set Microphone = CABLE Output. Whatever goes in one end of the cable comes out the other.
Picture routing
BOX creates HD Camera. For a digital human (or smart recorded) stream: click Go Live Now in the client, wait about three minutes, then add HD Camera as the video source in TikTok LIVE Studio. Finally, copy your live room link, paste it into Syntopia BOX, and click Connect. From there the AI host reads comments and answers viewers on its own — no OBS or deduplication needed to get started.
- Picture: BOX → HD Camera → added as the camera in your live app.
- Voice: BOX Speaker = CABLE Input → your live app Microphone = CABLE Output.
- Interaction: paste your live room link into BOX and click Connect so the host can read and answer the chat.
Chapter 5 — More ways to go live
The basic flow above is the digital human stream. There are five live stream types in total, and most of the difference comes down to where the picture comes from. Here is how each one works.
Real-Scene Live Stream
Real products, your store, or a physical space are on camera while an AI voice does the talking — no avatar on screen. Connect a webcam or a camera plus a capture card pointed at your products (good lighting matters). Create a New Livestream → Real Scene (no host avatar), add products and scripts, choose a voice in Settings, then Go Live Now. In TikTok LIVE Studio, add the real camera as the video source and set Microphone = CABLE Output. No deduplication is needed because it is a real live camera. Great for food, retail and product demos.
Smart Recorded Stream
This turns a recording of your own live stream into an interactive AI live stream: viewers see you from the recording, and when they ask a question the AI answers in your voice with your lips moving. Record 3–4 hours of yourself with good lighting and a steady camera, train it as a digital human (upload with a V5 avatar and tick Smart Recorded Only), then create a New Livestream → Smart Recorded Stream. There is no product script to write — the script is auto-created from the recording via speech recognition — but you add products and product cards that pop up when the product name is mentioned. Go Live Now, add HD Camera, and set Microphone = CABLE Output. No deduplication: the stream plays your recording and the AI lip-syncs every reply.
AI Hosting Assistant
No digital human here — you add your own camera and an AI voice answers viewers’ questions live. The picture is your camera (you, a presenter, or products); there is no script, and the assistant only speaks when it is asked something. Create a New Live Stream → AI Hosting Assistant, add products, then in AI Chat turn on Smart Live Chat, add your product knowledge, and set Live Chat Method to tick Assistant. Pick the assistant voice in Settings, click Save & Publish, then Go Live Now. (This is different from the assistant voice inside a digital human stream, which reads bracketed script lines.)
Human Takeover
Here a real person is the face while BOX does the talking. You sit in front of your camera; viewers see the real you and your mouth moves to the script or the AI’s answers, even though you are not speaking. Set the PC camera to 1920×1080, adjust rotation for a vertical stream, build the room, and click Go Live Now. Then click Human Takeover (top-left), choose the PC camera, click OK and wait about 30 seconds — the console switches to your camera and BOX moves your mouth to match the script. Click the same button again to exit. Nothing changes in TikTok LIVE Studio (you still add HD Camera). For the best results, train a V5 look on video filmed in the same fixed setup, lighting and distance you will go live in.
Window Mode with OBS
If you added dynamic scenes to a digital human stream, the live console runs in window mode. The rule: don’t add the window directly in TikTok LIVE Studio — going live from a window is easily flagged. Always go live from a camera, so turn the window into a camera using OBS. In the live console, switch to Window Mode (the icon at the top-right of the preview) and turn off the console’s own HD Camera. In OBS, go to Sources → + → Window Capture, choose the Syntopia BOX live window, set Capture Method = Windows 10 (1903 and up), and click OK. Then click Start Virtual Camera in OBS (it shows up as HD Camera), add HD Camera in TikTok LIVE Studio, and go live. The voice still comes through CABLE Output.
Chapter 6 — The toolbox
Open Tools for four utilities that make building and reusing content much faster.
Script Transcription
Turns a recorded live stream into a written script, so you can reuse the exact words that sold well. Select a recording (video or audio), let BOX transcribe it, then copy the text into your live stream script, clean it up, split it into lines, and use Vary or AI Rewrite on it.
Split Audio into Clips
Cuts one long audio file into short clips at natural pauses — the 3–15 second clips that Voice Conversion needs. Three settings control it:
- Silence threshold: audio quieter than this counts as a pause where a cut can happen. Default −24; lower it to −30 if it cuts too often.
- Minimum Duration: default 3 s.
- Maximum Duration: default 15 s; lower it if clips come out too long.
Select the audio file and it splits automatically.
Voice Conversion
Changes the voice in your audio clips into a cloned voice — so clips recorded by different people all sound like one chosen voice. It needs 3–15 seconds of clean reference audio with no music or noise. Select the reference audio, then select your audio-clip folder, and it converts every clip. Tip: run Split Audio first to get clips the right length.
RTMP Streaming
Gives you a streaming address for mobile live streams, remote cameras, and running one host across several PCs. Go to Tools, scroll to Stream → RTMP Streaming, and click Copy. In OBS: Settings → Stream → Service = Custom, paste the address into Server, leave the stream key empty, and turn authentication off. The same address works for both publishing and playback, and each extra PC uses that same address as its source. You don’t need this for a normal single-PC live stream.
Chapter 7 — Video Live Stream & the OBS Real-Time Deduplicator
This chapter is only needed if you want to go live with a video you recorded yourself. Live platforms such as TikTok and Douyin want real, live broadcasts, and their systems check every stream. A stream that looks pre-recorded or unattended can be restricted or banned.
What makes a stream look pre-recorded? A picture that never changes, audio that never changes, nobody interacting — and a looped video’s exact frames repeating, which is easy for a system to recognise. Deduplication means making sure no two loops are ever identical, like a real studio where light shifts, people move and sounds come and go.
“The plug-in keeps the picture fresh; the client keeps the conversation real.”
What the deduplicator does
- Picture modules: the Main Video module (varies playback speed, shifts colour, drops the odd frame); Mask Videos & Web Effects (a near-invisible moving layer that swaps to a new random one each round); Jitter (moves the picture about one pixel so it is never perfectly still); and Anti-Ban layers (transparent image or video layers viewers can’t see that make every frame unique).
- Audio modules: Audio Ducking (ambient or short co-host clips at random gaps, lowering the main audio while they play); Random Pitch and Random Volume (so audio never repeats exactly); and Dance to Sound (the picture moves with the audio).
- AI Voice Bridge: brings your AI co-host’s voice into OBS to greet viewers, answer comments and keep the room engaged — the real interaction layer.
What you download
Two things: the deduplicator software and a sample pack. The OBS Real-Time Deduplicator is a special version of OBS with the tools built in — an existing, normal OBS install will not show these options. It is included with every paid Syntopia plan and you download it from your dashboard at app.syntopia.ai.
You get one archive containing a ready-to-run OBS 30.2.3 with the plug-in already installed, plus the Microsoft runtime installer and an install guide (there is no setup wizard). To install:
- Run vc_redist for the Microsoft runtime.
- Unzip the OBS Studio folder.
- Go to bin → 64bit → OBS64.exe (make a desktop shortcut).
- In data → obs-plugins → win-dshow, right-click Virtual Cam Install and choose Run as Administrator (this installs the virtual camera that sends the picture to TikTok LIVE Studio).
The control panel is docked on the right (HD Camera, dedupe shield, anti-ban layers, live material, jitter, audio ducking) and adds filters normal OBS lacks — random frame drop, jitter, dance to sound. The sample pack is a set of ready-made example files, one folder per plug-in part (web effects, mask clips, anti-ban images and videos, audio clips). Point the panel at these folders and the plug-in picks a different file at random each round. Use the samples or add your own.
- Create a Video Livestream in BOX: the client speaks your script and answers viewers in your trained voice, while the picture is your recorded video played and deduplicated in OBS.
- Turn off the client’s own HD Camera, then click Enable HD Camera in OBS.
- In TikTok LIVE Studio, add HD Camera and set Microphone = CABLE Output.
- Set OBS’s audio output to CABLE Input (same as the client) so the deduplicator’s sounds go live with the voice.
Deduplicator module settings (exact values)
Parts 1–7 below were recorded on an earlier panel version; Part 8 walks the current panel button by button.
| Part / module | Setting | Value |
|---|---|---|
| 1. Basic OBS settings | Base canvas & output resolution (Settings → Video) | 1080×1920 (vertical) |
| Output mode | Advanced | |
| Streaming bitrate | 8,000 kbps (leave other encoder options as shown) | |
| 2. Main Video module | Random Speed | range 0.1, interval 30 s (speed 0.9–1.1, changing every 30 s) |
| Real-time Color Shift | 0.5, interval 30 s (colour shifts −0.5 to +0.5 every 30 s) | |
| AI Smart Frame Drop | ticked | |
| Random Frame Drop (in Filters) | interval 10–60, keep default 15 (e.g. 17 drops 1 frame every 17) | |
| Color Adjust filter | pre-set — don’t change | |
| 3. Jitter | Jitter distance | 0.01 (~1 pixel) |
| Jitter speed | 2 (jitters once every 2 s) — needs the Main Video module running first | |
| 4. Anti-Ban | Layer A | image asset folder |
| Layer B | video asset folder (can be moved anywhere on canvas); layer filters pre-configured | |
| 5. Audio Ducking | Folder | White Noise (ambient) or Control Room (short co-host clips; default Control Room 3) |
| Min / Max time | Minimum 10 s, Maximum 20 s (random gap between clips) | |
| Ducking Volume | 0 = muted, 1 = original, 0.5 = half; for control-room clips set 0 | |
| 6. Pitch, Volume & Dance to Sound | Real-Time Random Pitch | interval e.g. 30 s, other defaults (Audio Filter) |
| Real-Time Random Volume | defaults (Audio Filter) | |
| Dance to Sound | audio source = main video; drag Volume Threshold until the picture pulses; optionally tick Reverse Scaling | |
| 7. AI Voice Bridge | When to use | AI Co-Host (main video has sound) = use it; AI Host (main video silent) = not needed |
| Device | CABLE Output (VB-Audio Virtual Cable); filter has Sensitivity + Delay (default), ducking volume, and AI voice volume |
The latest panel, top to bottom
Part 8 of the video walks the current panel in order:
- Enable HD Camera (top right) — how you go live: first turn off the client’s own HD Camera, then click Enable HD Camera here, and your live software adds HD Camera as its camera.
- D-dupe Shield — animated web effects that dedupe the picture in real time; drag a folder of web effects onto the box or click to browse.
- Anti-Band Layer — a folder of images (JPG/PNG/etc.) for the same purpose, chosen by hand.
- Live Material — drag your recording onto it (no edits to the file needed), then click Start before going live. The confirm prompt locks the Sources panel; once locked the material can’t be changed.
- Enable Jitter — keeps the picture moving slightly; on this panel use distance 0.5, speed 8 (don’t make distance too large or speed too fast).
- Secondary Anti-Ban — extra video clips; drag videos onto the box and enable it (color-correction opacity is pre-set very low, don’t change it).
- Enable Audio Ducking.
- Filters on the main live material — four effect filters: Random Frame Drop (15 = 1 frame every 15; can also set 30), Color Adjust (basic), Jitter (keep the value small — a value like 23 is too big), and Dance to Sound (sound source = the material’s audio; Zoom Factor, Easing Step, Easing Range and Maximum Size control movement).
Together these give unedited material strong real-time deduplication of both video and audio — which is why it can go live with no cutting at all.
Which setup should you use?
Scaling up: one PC to many
A single PC runs a single live room. To run more rooms at once, you add more PCs and more Syntopia BOX accounts — one account and livestream slot per concurrent room. The video counts it up plainly: five rooms, ten, twenty, even a hundred. There is no hard cap; it scales with the PCs and accounts you put behind it. For the full plan line-up, see the Syntopia pricing page.
Frequently asked questions
How do I go live with an AI avatar using Syntopia BOX?
Install Syntopia BOX on your PC, install the HD Camera (virtual camera) and VB-Audio Virtual Cable, then create an AI digital human from a short training video. Build a live room with a script or AI-written scripts, click Save and Publish, then route the picture (HD Camera) and voice (CABLE Input → CABLE Output) into your live app, paste your live room link into BOX, and click Connect. The AI host then goes live and answers viewers on its own.
Do I need OBS to go live with Syntopia BOX?
No — for a digital human, real-scene, smart recorded, or AI hosting assistant stream you go live straight through your platform’s app with HD Camera and no deduplication. You only need OBS in two cases: Window Mode (to turn a windowed console into a camera) and Video Live Stream, where the OBS Real-Time Deduplicator keeps a recorded video from looking pre-recorded.
Can I clone my voice, and what languages can it speak?
Yes. A few seconds of clear audio is enough to clone a voice, or you can use a ready-made voice. The resulting voice model can speak 600+ languages, so your host is not limited to the language you recorded in.
What is the difference between Standard Mode and AI Stream Mode?
In Standard Mode you write the script yourself and control every word — best for brand messages, offers and must-say lines. In AI Stream Mode you import product info (name, price, selling points) and the AI writes the script automatically — best for going live fast across many products. AI Stream works with all five live stream types.
Why would a live stream get restricted, and how does deduplication help?
Platforms want real, live broadcasts and flag streams that look pre-recorded — a picture that never changes, audio that never changes, no interaction, and a looped video whose exact frames repeat. The OBS Real-Time Deduplicator varies speed, colour, frames, adds invisible jitter and anti-ban layers, and varies audio pitch and volume, so no two loops are ever identical — while the AI co-host handles the real interaction.
How many AI live streams can I run at once?
A single PC runs one live room. To run more at the same time you add more PCs and more Syntopia BOX accounts — one account and livestream slot per concurrent room. It scales to five, ten, twenty, even a hundred rooms; there is no hard limit, only the PCs and accounts behind it.
Launch a disclosed AI live seller on TikTok Shop, Shopee, YouTube and the Chinese platforms — no camera, no studio.